Can you have a campervan without cabinets? I guess so, but having some built-in storage really turns a van into a home, and cabinets aren’t that hard to build.
There are probably as many cabinet styles as there are campervans. The majority are made out of wood, and that’s probably what you’ll be building yours out of, too. It’s cheap, strong, it looks nice, and it’s easy to work with. It also requires a minimal amount of tools.
A quick diversion into alternative materials: aluminum can be used, though at a higher cost. There are many manufacturers of extruded aluminum channel, which can be used as a sort of construction set, complete with connectors, covers, and corners. It’s a nice material, being lightweight and stiff, and the large open spaces between aluminum rails can be filled with panels of wood, plastic, fibreglass, or aluminum.
Types of cabinet case
Cabinets are, in their simplest sense, just boxes. There are two main approaches to building these boxes: framed and skinned, or ‘integral.’
Framed and skinned
This sort of box construction uses solid wood, aluminum, or steel channel to create the frame of a box. The sides of the box are filled with a panel. Advantages to this construction are lighter weight – the frame is designed to provide much of the strength, so the sides can be made of lighter-weight material.
Integral
There might be a better / official name for this type of box, but I’m calling it integral because the sides of the box make up the box. You’re joining the sides to the back, top, and bottom, without a frame. It’s heavier, because the material you use throughout provides the strength. But it’s easier to build, can be stronger, and in my experience is more solid, meaning no rattling and squeaking – a big consideration when building your camper.

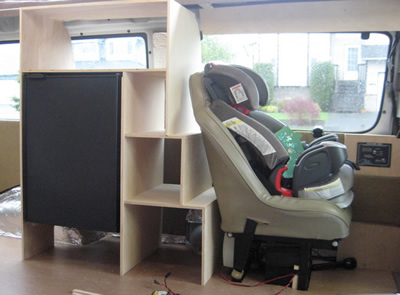
A quick note about weight: I’ve mentioned my opinion that integral cabinets are heavier than framed and skinned. This all depends, of course, of your choice of materials for either version. But either way, the weight differences should be minimal. Plywood is a fairly lightweight material, at least in the 1/2″ variety that’s appropriate for a camper. The difference in weight, per cabinet, is probably only a few pounds. My largest cabinet, which is about four feet tall, by three feet wide, and two feet deep, and has multiple dividers and shelves, weighs about 30 pounds (it’s the one pictured above).
What wood to use
Plywood is the obvious choice of material when building wooden cabinets. It’s lightweight, strong, resists moisture and warping, and comes in beautiful, flat, large sheets. Solid wood is more high-end, but comes with a number of drawbacks: price, warping, and weight.
When dealing with sheet goods, please be aware that ‘plywood’ means plywood, not any of the lesser alternatives. These lesser goods include medium-density fiberboard (MDF), particle board, and oriented strand board (OSB). All of these are less expensive, because they consist pretty much of sawdust or woodchips mixed with glue and pressed into a sheet. They’ll weigh considerably more, will suck up water like a sponge, and in most cases offgas nasty chemicals from the glue. Speaking of which, there’s more about plywood on the Plywood page.
Joinery techniques
I’m going to talk about integral cabinetry here, because I think it’s the best way to do it. Strong, easy, and looks nice.
There are a number of ways to join the sides, backs, tops, and bottoms together.
Pocket screws
Pocket screws are an amazing way to build cabinets! They’re strong, easy to work with, fast, and – if planned properly – can be almost invisible.
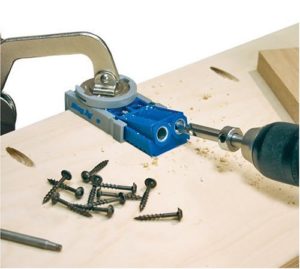
It’s not the screws themselves that are so good, but rather the system. You’ll need to buy a pocket screw jig, like this one from Kreg, which is the one that I use (you’ll also need a clamp, the Kreg clamp is perfect and attaches to the jig – definitely worth it, in my opinion, as you’ll save much fumbling and time over the dozens/hundreds of pocket holes you’ll drill).

The jig clamps to your board, and guides a special, stepped drill bit into the wood at a specific angle. The creates the ‘pocket’ for the screw. When the screw is placed into the pocket, and the boards lined up, your screwdriver will drive the self-tapping screw into the mating piece of wood, pulling the two together tightly. Pocket screws also have a nice tendency to pull the pieces to 90 degrees – a nice feature when building a box!
My first major campervan build used these exclusively, and is still going strong tens of thousands of miles, and many many nights of camping, later.
Biscuits
Coming soon!
Rabbets and dadoes
Coming soon!
Hardware (hinges, drawer slides, and more)
Picking hardware is largely a personal choice. It’ll depend on your preference as to color (brass? stainless?) and cabinet construction (overlay doors? inset doors?). But there are a few universal truths:
RV slides: I found these stay-close RV slides a few years ago and I use them on all of my drawers. They have a spring-loaded detent that keeps the drawers closed through all sorts of crazy driving 🙂 With a little tug, the drawers slide open on nice, heavy-duty ball bearing slides. They snap shut when you close them, too.
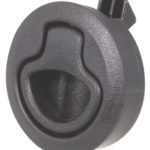
Latches: if you don’t like the RV slides, you’ll need some way of keeping drawers closed during cornering. The last thing you want is for your drawer to fly open on a corner and spew its contents throughout your rig 🙂 People like the quality of these Southco flush-mounting latches, and they’re probably the nicest-looking that I’ve seen.

Securing your cabinets
I’ll write this section up soon. This will vary a lot between different vehicles, but the important thing is to really secure your cabinets well. You don’t want them flying around in an accident!
Tips and tricks
Corner clamps
One of the best tool purchases I’ve ever made! Corner clamps quickly and easily hold two pieces of wood together at a perfect 90 degree angle. They allow you to adjust and fine-tune the joint before you screw it or glue it together. These’ll speed up your cabinet building dramatically. I use clamps similar to these from Wolfcraft. $20 for a clamp seems like a lot (and you’ll want two of them) but I’d pay $100 if I had to for these!
The following photo from outsidetheboxdrums.com shows how these clamps work (though you can get by with fewer clamps than shown here – I use two for the most part, or four for bigger or more complicated joints):
