There are innumerable ways to mount solar panels to the roof of your vehicle. Your decision will depend on your roof surface (is it sheet metal, fiberglass, rubberized / is it flat or curved?), your panel’s dimensions, and factors such as whether the panel will need to tilt or be removed at any point.
The simplest method
The easiest way to mount a solar panel to the roof uses a few lengths of angle aluminum. One side of the angle is bolted, screwed, or adhered to the roof surface, while the other side is attached to the panel.
Panels commonly used for campervan purposes, such as the Kyocera 65, 130, or 135 watt panels, are strong enough to be mounted only at the far ends. This allows for simple installation, with a bracket near each corner, or with two lengths along the short ends of the panel:
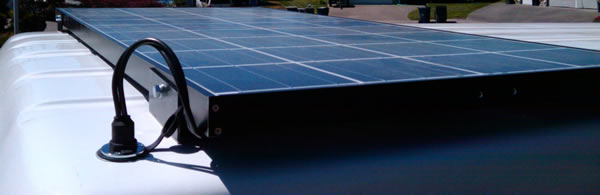
The picture above shows a Kyocera 135 mounted on a Sportsmobile pop-top, using four 5″ lengths of 2″ aluminum angle. The brackets were bolted through the solar panel’s frame, and attached to the roof with 3M VHB tape. Using a single bolt through the bracket and frame allowed me to adjust the angle of the foot to match the curve of the roof.
3M VHB
It’s understandable that many people are leery of drilling into the roof of their vehicle to anchor their solar panels. Improperly sealed holes in the roof can be disastrous, allowing water to penetrate and destroy insulation, upholstery, and sheet metal.
AM Solar sells a solar panel mounting kit that optionally comes with 3M VHB tape, instead of screws. I emailed the owners to ask about this, and quickly received a very nice and thorough reply. Basically, they’ve been using this extremely sticky tape for over ten years, with no reports of panels coming off, including 6 panels on their own RV.
VHB stands for ‘very high bond’ and is an incredible substance. There are a number of videos on YouTube demonstrating its properties – basically, it finds its way into all of the little pores of the materials on either side, then benefits from its flexibility to provide an incredible bond.
I’d already been using VHB for a number of things (such as mounting a battery separator in the engine bay, and some paneling inside the van). I’ve since mounted my own panel with the same tape, with good success! I managed to avoid drilling into my Sportsmobile pop-top, which was especially useful for me as my panel wouldn’t allow mounts outside of the interior upholstery. Any through bolts would have had to penetrate into the cabin space.
There are a number of different model numbers for VHB tape; I used 4991.
Tilt mounts
Solar panels are most efficient when oriented directly towards the sun, and their output can drop as the angles diverge. Some solar panel installations therefore include a way of tilting the panel when parked, for maximum power.
Power increases can be in the range of 10% to 20%, but only when you’re able to park with the tilt facing South, and only when you’re willing to climb up onto the roof of your vehicle to set up the tilt. For this reason, many owners decide against the added complexity and cost of a tilt mount.
If you’d like to set up a tilt, there are a few ways of doing it.
Starting with AM Solar, mentioned previously:
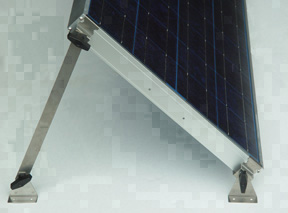
This setup uses simple stainless steel ’tilt bars’ that are inserted between two of the mounts on the roof, and their equivalents on the panel. They use plastic knobs and captive nuts to make it easy to unscrew and reattach the bars / panel. ~$90.
I have no idea who manufactures this cool mount, using flexible rubber posts, but it might spur some ideas in you DIYers:
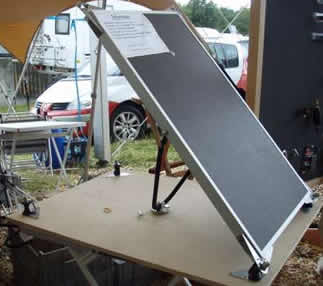
Photo credit: AndrewST on sportsmobileforum.com
Wiring
Getting your wiring from the panel into the van for a connection with your electrical system can be tricky. Drilling a hole for the wires, and trying to seal it with silicone, is difficult at best, and any movement in the wires can undo the seal.
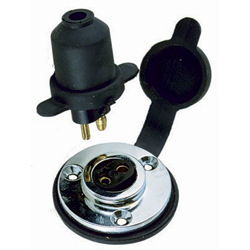
I ended up using a marine through-deck fitting:
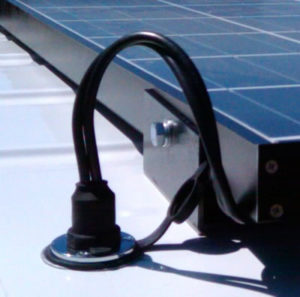
It’s made of two parts: a female end, that is recessed into the roof, and sealed with silicone; and a male plug, with a rubber boot. It’s a quick connect plug, so the panel can be unplugged in an instant, and there’s a rubber cap to cover the female plug in that case.
About $25 from Amazon.
Update: The plug that I used seems to be getting pretty bad reviews on Amazon. It worked well for me, but I can’t speak to its long-term performance. Here are a few alternatives that get better reviews:
- Blue Sea Systems CableClam: a rubber gasket that provides a waterproof passthrough. It’s not a plug like the Perko – the wire passes right through it. Reviews say that it works below the waterline on kayaks, so it should be pretty waterproof. Blue Sea Systems are a good quality provider of 12V marine components.
- Seachoice Watertight Deck Connector: So far this one gets five stars, and it looks solid. It’s the same philosophy as the Perko, made of chrome-plated brass.
which VHB tape did you use? There are several 3M brand VHB tapes available.
Thanks
I used 4991: http://amzn.to/2tcmXCI
I put one strip, the length of the bracket, on each corner. That thing isn’t going anywhere 🙂 It’s amazing stuff.
Hi, it looks like your van is painted steel with a clear coat. I’ve got a fiberglass top with a powder coat for my van and would like to try an adhesive. Do you know if 3m’s 4991 can be used in this application?
Funny you should ask this now, I was *just* looking at tape numbers so that I could mount a Quick Fist to a plastic truck bed!
The solar panel I mounted was steel to gelcoated fiberglass (a Sportsmobile poptop) and the 4991 was super solid. No hesitation recommending that tape. There’s more information about alternative numbers (maybe too much information!) in this thread that I was reading earlier today: http://www.sportsmobileforum.com/forums/f9/which-vhb-tape-14624.html
For the Quick Fist mount, I bought the 5952 as it was a little less expensive than the 4991, and the consequences of failure were much lower than a solar panel flying off of the roof 🙂
Good luck!!
Mike.